Site Planner is designed for home builders, developers, and brokers to quickly gauge lot yield and assess site viability to qualify deals before committing engineering time and costs. Site planner allows customers to create lot layouts and demonstrate feasibility to stakeholders.
Important Note: Before you can use Site Planner, first select a property and save it as a Saved Map. If you are not working within a Saved Map, the Site Planner icon will appear disabled in the toolbar.
Quick Start
- Save Map & Select Property: Ensure your project is saved. This unlocks the tool.
- Add Exclusions & Constraints: Define unbuildable areas and set necessary buffers.
- Draw & Configure: Layout your roads and define specific regions for different product types.
- Generate & Edit Lots: Autogenerate yield or manually refine individual lot boundaries.
- Review Data: Use the Summary Panel to verify density and zoning compliance.
Feature & Capability Overview
1. Exclusions
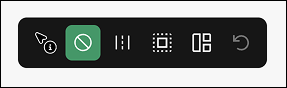
Exclusions define areas that will not have lots built on them.
- Environmental Zones
- Exclude wetlands, green spaces, or flood zones.
- FEMA flood zones are autodetected as exclusions.
- Amenities
- Reserve areas for clubhouses, bark parks, or other amenities.
- Buffer Zones
- All excluded areas can have a buffer zone (e.g. 30ft) applied to them that further restrict lot generation.
- Buildable vs Unbuildable
- Each region can be defined as buildable (e.g. community space) vs unbuildable (e.g. floodzone) and will be included in the site summary.

To create an excluded area:
- Click the Exclusions Tool Active button.
- Click on the map to place your first point.
- Counting, clicking, and placing points to define the shape.
- To close the shape, click the first point again.
- A panel will prompt you to select Buildable or Unbuildable.
- Enter a name to save the Exclusion.
- A new excluded area will appear in the Exclusion section.
- Net buildable and unbuildable acreage will be reflected in the site summary on the top right corner of the map.
To edit an existing exclusion:
- Select the exclusion icon from the toolbar at the top center of the screen. Click and drag each point to change the shape.
- On the left panel, find the exclusion. Click the edit button (pencil icon).
- Update the name of the exclusion.
- Change the color of the exclusion.
- Define a buffer around the exclusion.
- Categorize it as buildable or unbuildable.
- To delete an exclusion, click the trashcan icon. A window will open asking you to confirm your choice, then the exclusion will be deleted.
Site Summary and Exclusions
- Net buildable and unbuildable acreage will be updated as you make adjustments. You can see this in the site summary on the top right corner of the map.
2. Right of Way (Roads)
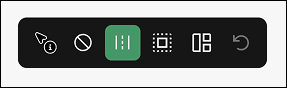
The Right of Way (ROW) panel allows for assigning the dimensions of the roads running through the site.
From this panel you can set:
- Road width
- Sidewalk width
- Corner radius
- Cul-de-sac Diameter is currently in progress and expected Summer 2026
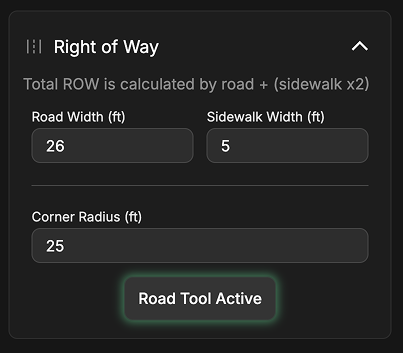
Note: Total Right of Way is calculated by the width of road + (sidewalk x2).
To add a new road to the site:
- Select the road icon from the toolbar at the top center of the screen.
- Click to place the road beginning point.
- Moving the cursor allows you to preview the road layout.
- A live preview of the lot layout will appear when the cursor movement is paused.
- Lots will generate on either side of the road.
- Exclusions will prevent lots from generating if the road passes through that zone.
- Regions that will populate the assigned lot type in real time.
- Any changes to lots, exclusions, regions, or right-of-ways will update the site plan in real time.
- Clicking will place a new anchor point, locking that stretch of the road in and for an intersection or curve.
- To end the road, double click on the map. The road will end where the map was double clicked.
Road Placement Guide
When building roads with the road tool, look for the colored dot to find the best spot for your lots to generate.
- 🟢 Green: Lots will generate efficiently
- 🟡 Yellow: Lot will generate with extra space
- 🔴 Red: Lots will not fit
To edit an existing road:
- To update the dimensions and corner radius, simply update the text fields in the Right of Way panel on the left side of your screen.
- To edit road layout, select the road icon from the toolbar at the top center of the screen.
- Repositioning a road.
- The hand tool allows you to click and drag to reposition a segment of the road.
- This appears when hovering over a point on the road.
- Deleting a road segment.
- To delete a road segment, right click on a section of the road.
- The selected road will highlight and a Delete prompt will appear on the map.
- Confirm that this is the right, then click Delete. That segment of the road will disappear.
- Adding branches.
- To add a new road branch, hover over an existing road.
- When a point appears, click and drag your cursor.
- A preview of the road and lots will appear.
- Proceed as if creating a new road.
Site Summary and Right of Way
- The Site Summary will automatically calculate road area and road length in real time.
3. Lots
The lot panel allows for lot types to be defined and modified. Lots are generated by placing roads and can not be individually placed.
From this panel you can:
- Create a new lot type
- Name a lot type
- Enter dimensions and setbacks
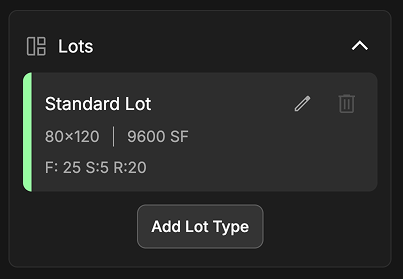
To create and edit lot type:
- Click Add New Lot Type from the Lot panel on the left side of the screen.
- A new lot category will be created automatically.
- Click the pencil icon to edit the lot. A panel will open allowing you to edit:
- Dimensions
- Setbacks
- Lot type name (e.g. Standard Lot, Townhome, Luxury, etc)
- Lot color
- Click Save to save your specifications.
- If lots types have already been placed on the map:
- Lot dimensions/colors will update in real time to reflect the changes.
- The numbers on the lots will automatically recalculate.
To edit an individual lot that has been generated by placing a road:
- Select the lot icon from the toolbar at the top center of the screen.
- To reposition lot boundaries:
- Click on a lot.
- A point will appear.
- Click and drag to reposition the boundaries.
- To quickly fill in gaps between lots:
- Hover over the edge of a lot and a blue border will appear.
- Double clicking the line will move the lot boundary into contact with the adjacent lot.
- To delete a lot:
- Right click on the lot. A panel will open prompting you to confirm deletion.
- Click on a lot, hit backspace/delete on your keyboard. The lot will immediately be deleted.
Automatic Renumbering:
- When you change a zone or delete specific lots, the map dynamically numbers the remaining lots to maintain a clean numerical layout.
Site Summary and Lots:
- The Site Summary will group each lot type together and count the number of lots.
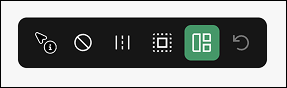
4. Regions

Regions define the areas for each lot type to be generated. Regions must be assigned to have additional lot types populate.
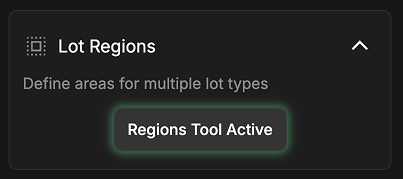
To create a region:
- Click the Regions Tool Active button.
- Click on the map to place your first point.
- Counting clicking and placing points to define the shape.
- To close the shape, click the first point again.
- A panel will open, prompting you to select a lot type.
- Note: The lot type must first be created under the Lots panel.
- Select the lot type you’d like to be generated with this region.
- A new region will appear in the Region section on the left side of the screen.
To edit an existing region:
- Select the region icon from the toolbar at the top center of the screen. Click and drag each point to change the shape.
- On the left panel, find the region. Click the edit button (pencil icon).
- Update the name of the exclusion.
- Change the color of the exclusion.
- Change the associated lot type.
- To delete a region, click the trashcan icon. A window will open asking you to confirm your choice, then the exclusion will be deleted.
Mass Editing:
- Applying a lot type to a designated Region dynamically formats any current or future parcels within that boundary to match those rules.
6. Considerations
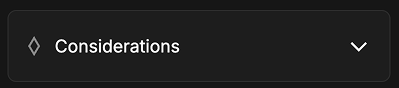
This is optional criteria where you can define density requirements and minimum lot size.
Minimum Lot Size:
- This will prevent any lot from being generated that is smaller than these dimensions.
Density Requirements:
- This will be reflected in the Site Summary as a Pass/Fail based on the number of lots generated.
7. Autogenerate
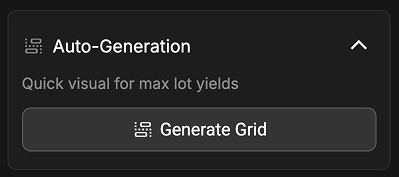
If you do not want to manually map out your own roads for lot generation, we offer an autogenerated plan.
- This takes into account all exclusions, regions, lots, and right of way criteria that were set.
- Everything is fully editable, just as it is if you manually placed each road.
8. Site Summary
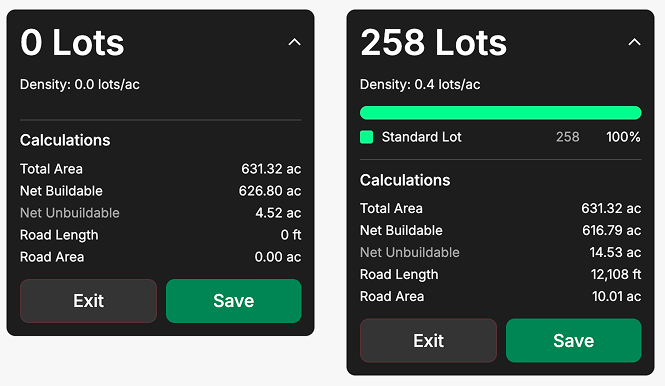
The Summary Panel provides a live dashboard where you can see a summary of the site plan.
- Density:
- Automatically calculated based on the number of lots placed vs acreage of site.
- The Pass/Fail indicator is based on the criteria set under Considerations.
- Calculations:
- Lot counts are calculated as roads are placed.
- A bar graph will display the breakdown of each type of lot.
- A list will itemize each lot type with a total count.
- Total Area:
- This is the area of the boundary selected for the site layout.
- Net Buildable:
- This is the Total Area - Net Unbuildable.
- Net Unbuildable:
- This is the net total of any exclusions that were defined as unbuildable regions.
- Road Length & Road Area:
- This is automatically calculated as roads are placed and/or edited.
Quick Tips
For deeper understanding of site terrain, toggle on additional insights located in the bottom left corner of the map.
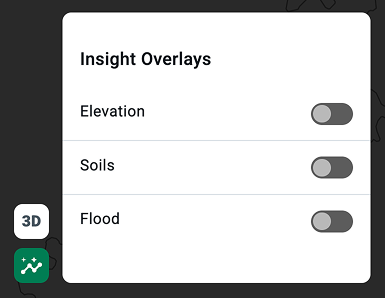
- 3D Mode will allow you to visualize slope and terrain.
- Elevation can be used in 2D mode to visualize high/low points of the property and determine road placement.
- Hovering over each contour interval displays elevation.
- Flood can be turned on to visualize flood zones or wetlands that may overlap with the site.