Quick Start Guide:
- Navigate to your area of interest on the map and create a new or open an existing map.
- From the Tool Bar, click Upload then Image Overlay. Upload your image to the map.
- Place the image and make adjustments to the image and positioning. Read on for details.
What kind of images work well for image overlay? This could be a plat map you scanned, a site plan from a developer, an aerial photo from a drone flight, a survey drawing, or any image you want to lay on top of the map. Scroll to the bottom for other common use cases.
Detailed Instructions:
Step 1: Prepare Your Map
- Navigate to your area of interest on the map and zoom in appropriately. The image will initially appear in the center of your map.
- You’ll be required to work within a saved map, so you can create a saved map first — or you’ll be given that option after uploading the image.
Step 2: Upload Your Image
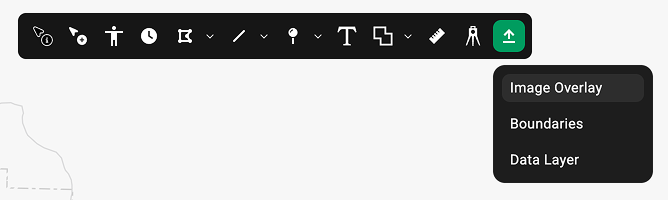
- Find the Tool Bar at the top of the map then find the Upload icon on the far right. Click Upload to see a drop down menu.
- Select Image Overlay. This will open an Upload Image window. Click to upload an image file or drag and drop into the window.
- Drag and drop any image file (.jpg, .png, .webp, .pdf) into the upload zone, or click to browse. Files up to 5 MB are supported.
- Click Upload to add it to the map.
- If you haven’t already, you will be prompted to save your map before your image appears.

Step 3: Place the Image & Make Adjustments
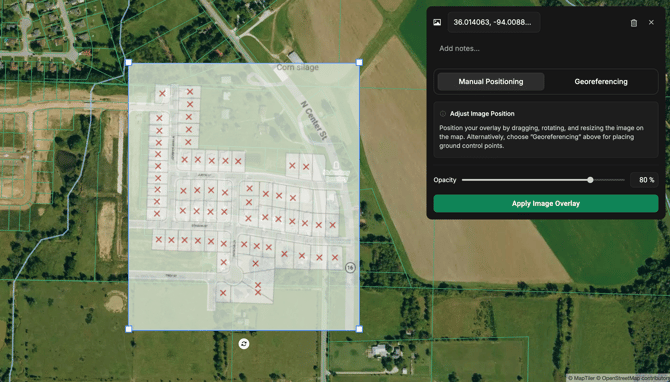
- The image will appear (semi-transparent by default) on the map near the center of your current view.
- The Image Overlay Adjustment Panel will also open on the left. This gives you controls to fine-tune the placement.
- You have two ways of positioning and adjusting the image: Manual Positioning or Georeferencing
- Either way, once you have made your adjustments, click Apply Image Overlay.
Position Your Image Manually (Manual Positioning)
Best for quickly adding and manipulating images on a map without the need for exact locations.
- Resize the full image by grabbing the corner handles and adjusting.
- Stretch the image by grabbing the edge handles and pulling horizontally and vertically.
- Rotate the image by grabbing the arrows icon at the bottom of the image.
- Move your image by hovering over the image, clicking, and dragging.
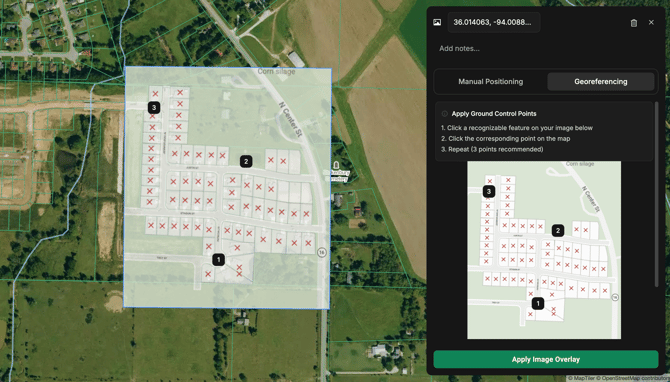
Position Your Image With Ground Control Points (Georeferencing)
Best for setting precise locations for images on the map. Setting control points warps and stretches the image so it lines up with real-world geography.
- Define ground control points by identifying known points on your uploaded image.
- This can be a road intersection, property corner, section corner, or any feature you can also find on the base map.
- Click that point on the image, then click the corresponding location on the map. This creates a control point that anchors that spot.
- Repeat with at least 2–3 control points spread across the image. The more points you set, the more accurate the alignment will be, but 3 points is recommended.
- After setting control points, you can:
- Adjust opacity to visually verify alignment against the parcel lines and satellite imagery underneath.
- Add or move control points if something isn't lining up.
- Use rotation as needed.
Step 4: Fine-Tune the Alignment
- Whether adjusting manually or via georeferencing, the key to a good overlay is matching known reference points.
- Find features that appear in both your image and the base map. These could be road intersections, property corners, waterways, or building edges.
- Use the opacity slider to make the image more or less transparent. This ability is super useful for lining things up, since you can see the base map through your overlay.
- Once you have made your adjustments, click Apply Image Overlay to go back to your saved map. Your image will remain on the map.
Step 5: Use It
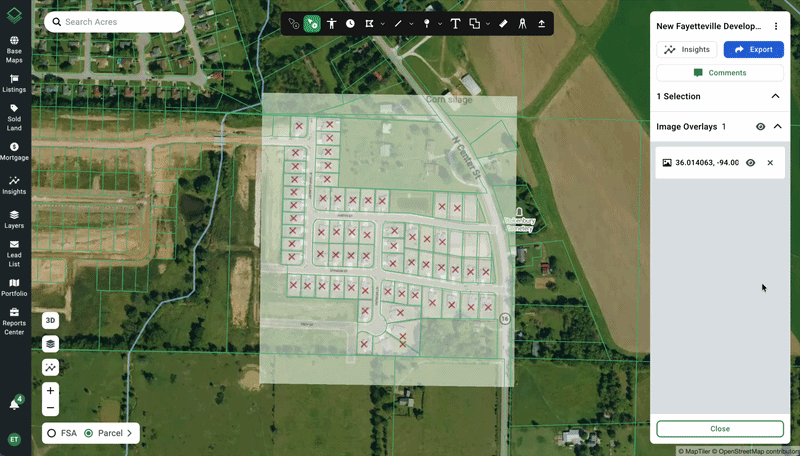
- Once positioned and applied, the image overlay will stay on the map as you zoom, pan around, and toggle on other layers.
- Hide/show the image by clicking the eyeball icon next to the overlay in the selections panel.
- Rename the image by clicking
- Click on the Image Overlay card in the selections panel to make adjustments.
- Edit the name of the image on the top text field.
- Add notes for future reference.
- Quickly adjust the transparency level with the opacity slider.
- Click Adjust Position to open the full editing panel.
Tips for Best Results
- Use features that are clearly visible on both the overlay image and the base map.
- Spread your control points out. Try not to cluster them all in one corner. Points near the edges and center give the best results.
- Start with opacity around 50–60% so that you can see both the overlay and the base map simultaneously.
Common Use Cases
Survey Plats — Overlay a recorded plat to see how lot lines compare to current parcels
Site Plans — Drop a developer's plan onto the actual terrain
Historical Aerials — Compare old imagery to current conditions
Drone Photos — Georeference your own aerial photography